Black and White Kitchen Remodel with Painted Cabinets
The kitchen is the heart of the home, so when you want a personality change in your home, start with the kitchen! Our guest today has a stunning black and white kitchen remodel to share:


And now, the details of Kate’s beautiful kitchen:
Black and White Kitchen Remodel with Painted Cabinets
by Kate of Eating in the Shower

Hi everyone! I’m Kate from Eating in the Shower and I’m so thrilled to be sharing our kitchen remodel with you. I’ve been blogging about our military family life and DIY projects for a little over a year now but finding inspiration from sites like Remodelaholic for much longer so thank you, Cassity for letting me share our remodel story!
So far we’ve made houses into homes in California, Yemen, Switzerland, North Carolina, and New York. We have a two year old son and a Vizsla who is seven but still acts two so our free time is not what it used to be. I love thrifting, creating, and crafting and I try to find ways to fit it all in to avoid the time management fail my blog got its name
from!
Even though I’ve loved all of the travel, one of the most difficult aspects of military family life is leaving behind the homes that we’ve made our own through DIY projects. It makes it easier to know that with each new house, we get opportunities to change up our style a bit or try a new remodeling project. I’m sure my husband never imagined that he would be painting kitchen or vanity cabinets before we bought this house! Which brings me back to our kitchen. When we bought our house it was one of the things I liked least about it.
 |
| Source: 2010 MLS |
The before photos of the kitchen show the worn flooring and countertops, aging appliances, and the cabinets with very prominent grain. The grain stood out so much it looked like the doors had an animal print on them.
The lack of counter space was also a huge problem for us because we love to cook and host dinners and I can take up a lot of space decorating a cake! The tiny island was barely big enough for a fruit bowl. Even the green paint had to go.
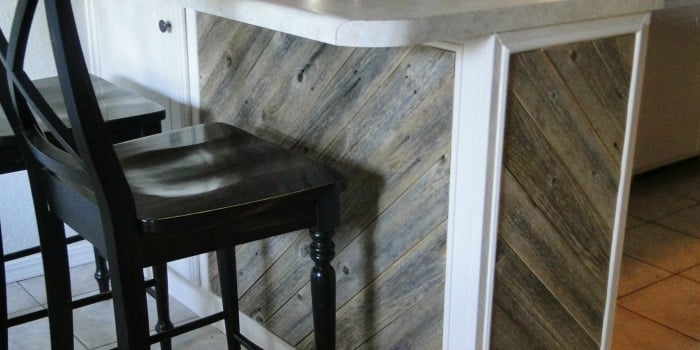
 We decided to paint the existing cabinets white and create as large an island as we could fit using a combination of custom sized Kraftmaid base cabinets. My husband joined three base cabinets to form the main part of the island and then constructed a small bump up off the front of it to create a small barstool area. It is quite a change from the tiny island and I can still cover the whole thing when I’m working on a project so I couldn’t have lived without it.
 Here is a look at the island from the stove area.

Along with the DIY cabinets we replaced the appliances, light fixtures, faucet, and had new countertops and ceramic tile flooring installed. The countertops are LG Viatera Quartz in Abyss. For the finishing touch we made window boxes covered in black and white patterned fabric and covered the barstools with the same fabric.

It was important to me that the grain and rough texture on the cabinet faces be covered. I didn’t want to still be able to see the wood grain after going through the work it takes to refinish cabinets. To prevent it, we tried this brushing putty.

It filled in the grain and provided a smoother finish than I expected. Here is an in progress photo of one of the sanded cabinet doors after the putty was applied and then partially sanded away. This step was worth it to us for the result we achieved but adds extra time and work to the project so it may not be for someone trying to get done quickly.

Here is a closer look at a finished cabinet

This is a rundown of the cabinet refinishing and how our kitchen went from “Oh-Noing” to Glowing:
- We removed all cabinet doors and drawer fronts and lined them up in the garage on sawhorses to clean them with a degreaser (TSP) to remove the built up kitchen grime.
- Next we sanded the existing finish from the surfaces by a combination of hand sanding with 220 grit sponge sanders and power sanding with a sheet palm grip sander. We sanded until all finish was removed and bare wood exposed. (On the cabinet boxes in the kitchen we opted to use deglosser to prepare for painting rather than sand them down and create a bigger mess in the house than necessary.) They don’t show as much and did not have the same deep grain as the doors so this was a better choice.
- Once the cabinets were sanded, we added the crown molding to the top with the doors still removed. We used two 8 foot lengths of stain grade pine molding, a compound miter saw to make the angled cuts, and a pneumatic brad nailer to attach it to the top edge of the cabinet boxes.
- To fill the remaining grain on the doors and drawer fronts we followed with the brushing putty. After applying the putty and letting it dry, we sanded off the excess in the same way we sanded the original finish off, leaving the grain filled and the surface smooth.
- After the prep work was finished, we applied this oil based primer to the doors, drawer fronts, and the cabinet boxes and allowed it to dry before flipping the doors and fronts and doing the same to the undersides. We applied the primer with a fine nap roller and a high quality paint brush to minimize brush strokes.
- Using a jigsaw, we cut beadboard style hardboard panels to fit the ends and exposed sides of the base and wall cabinets and attached it with construction adhesive.
- The final step was to paint the cabinets with Benjamin Moore Satin Impervo in White Dove. The paint was applied by hand with the same materials used to apply the primer. The paint had great leveling properties and this helped prevent brushstrokes and, along with our other techniques, produced a very smooth finish. It was a high quality product to work with and had a lot to do with the look we achieved.


I did save money on the light fixtures. The kitchen table light was a clearance find from Home Depot for $29 and the ceiling fixture is from Lowes. I also used off the shelf door and drawer hardware from Lowes.

Our goal was to keep the remodel costs under $20K. Because we wanted new appliances, floors and counters we were expecting it to be right around there. Even with the paint and all of the painting materials we ended up spending about $17K. The entire project was completed over a two month period, including lead time for cabinets and counters, because it had so many different components.
A rough breakdown of costs:
Counters $4800
Custom Island Cabinets $2000
Floor installation $4000
Appliances $5500
Wall color: Benjamin Moore Platinum Gray
Cabinet Color: Benjamin Moore White Dove
Countertop LG Viatera Quartz in Abyss
Island Cabinets: Kraftmaid in Dove White
Happy sign, kitchen sign, and giant fork: Hobby Lobby
Mirror and red soap dispenser: Homegoods

Thanks for reading and I hope you’ll stop by Eating in the Shower to check out our other projects and follow along with us as we get ready for our next move!
Kate
Thanks, Kate! Good luck with your move — can’t wait to see you work your magic on your next home!
Lorene has been behind the scenes here at Remodelaholic for more than a decade! She believes that planning projects and actually completing them are two different hobbies, but that doesn't stop her from planning at least a dozen projects at any given time. She spends her free time creating memories with her husband and 5 kids, traveling as far as she can afford, and partaking of books in any form available.


Thank you so much for featuring our kitchen! Have a great weekend,
Kate
Your project is awesome! What cabinets did you use to create the island and how did you build the raised bar area on it? Thank you.
Looks great! I’m painting my cabinets now with BM Advance. I don’t know if I like the paint or not. It isn’t very easy to work with, but when researching it was the paint everyone recommended. I’ve never heard of BM Impervo. What made you choose it?
How did your husband join the 3 cabinets for the island? From the shot looking from the stove, it looks like some of the drawers and doors would have to be false fronts because they share the same space.
Your remodel turned out beautiful! The layout of your kitchen is pretty similar to ours and has me rethinking how we’d planned to redo our layout…pinned a couple of your after photos to show my husband. :^)
I have a small kitchen but would love to have an island. How do you figure the size of the island in relation to the rest of the U shaped floor. I removed the wall bet kit/dining room to make it more open
Hi Flor,
Island size is personal preference, it seems like — with enough space to move around it. If you’ll send us a picture or two and your question over on Facebook, we can ask our readers what they’d do in your situation. https://www.facebook.com/remodelaholic
Beautiful! Do you find that your painted cabinets are sticky? I think that is my biggest hesitation with painting our cabinets. I’ve been to a few houses where the cabinets have been painted and they seem to be sticky, and the paint is almost gluey if that makes sense.
Hi Mallory,
I can’t speak for Kate’s cabinet specifically, but generally if the paint is sticky like that, it was either not prepped properly or not allowed to fully dry and cure to harden the paint and/or sealer (or both). That cure time is really important! This post might be helpful: https://www.remodelaholic.com/how-to-paint-cabinet-doors/
This is a beautiful kitchen! I am about to make a decision on the countertops for our kitchen, which also has white painted cabinets. I am seriously considering a black quartz, but I’ve read so many (negative) comments about how it shows every finger print and dust speck. How high-maintenance are you finding it? Help!