Master Bedroom; Retro Remodel
Our master bedroom remodel never seemed to end. It was a continuing project. We cleaned it out, then cleaned it up, finished and then started again, re-installed a closet and finally finishing for good. That sounds all short and sweet, but it happened for about 3 years.
I will explain as I go.
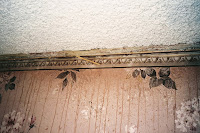
Before:


(you can see the old closet doors that later became
our interior window shutters in the living room project!)
Technically the wall paper is kinda cool, the blue print was actually velvet. But the room was just old and smelly and really needed to be refreshed.
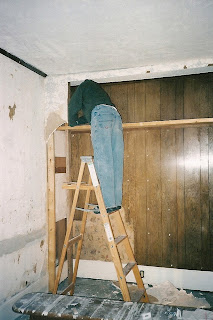
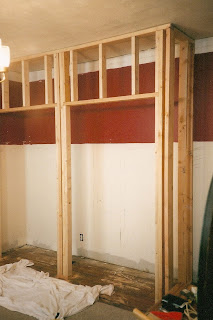
We started by taking out the book shelves around the hall door (in the picture directly above). And we found a little surprise when they were removed.

The original closet!! It was so tiny! only 16 inches deep and on a diagonal.

Here is the view of the floor of the closet.

It was full of junk and we even found a purse with receipts in it. I wish that it could have been full of money!
Next we removed the paneling and all the wallpaper. We got rid of the junk on the ceiling.
This wall paper was under the paneling, I actually liked it but it was in such bad shape.
There was a cool painted design on the ceiling too.

The closet was really very small, and not planned very well. We had a room right next to ours that was really small so we made it our dressing room for a few years. We removed the closet, with huge future plans for an addition, ha. ha.
Here is the wall after. Can you see that there was once a sink on this wall? I think this might have been the kitchen at some point. The basement, suggested that it had been built on to where the new kitchen was. I wish I could know for sure! Honestly I think that the house was a little older than the 1904 date that was documented.

The floor came next. (At the same time we sanded the living room.) There had been a rug in the center of the room and the outside edges had all been painted. We got some heavy duty ventilation masks and Justin removed it. It is kind of scary to me now that we even did it.


At this point we lived with the bedroom for a while. We were working on other projects, so we brought the one scrap of carpet in the house that was relatively decent from the Blue Room and used it as a rug under our bed. Also, we had boxes around the edge to keep the floor in tack. Ghetto! Just the way we like it!
When I finally got around to finishing it, I had learned from the living room that I must stain. So, I did, the outside 3-4 feet and finished it, then we installed a rug in the center.
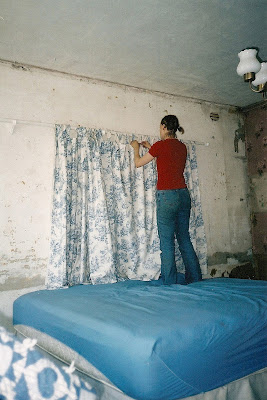
We didn’t own a head board… Oh wait, we still don’t! OOPS! Anyway, I had made these drapes for our apartment in Orem and as you can see the wall was sorta falling apart, so I made a curtain head board for the mean time. ( I ended up revamping these drapes and using them in the blue room with an added panel at the bottom)

I made these nightstands in wood shop. One of the only electives I took in college. I am so glad I took it!
I used a stain wax to finish them (thanks to the New Yankee workshop, I love you Norm!) instead of regular stain and poly.
Here they are with the clearance lamps we got at Kmart sporting goodwill lampshades, later we switched those out, with Wally-world shades! I Got rid of these lamps and now I totally regret not having them… What was I thinking?


You may have noticed that the walls were falling in around us. I got sick of it and used some left over bathroom drywall to do a patch… It is rather homely! You may also notice that the original door had been replaced with a boring hollow flat panel door…ugh!
Luckily we had a some friends who had a hundred year old house that was being torn down. They let us come and take all their old doors, and we replaced all the doors in our house and some more with original 5 panel doors.

Our good friend Jared who was a drywall contractor came and taught us how to really do drywall. Thanks Jared! It has helped us in all three of our houses! First we removed the crumbling plaster, and concrete patches, I think there were 2 truck loads of plaster.


We found yet another little surprise and more evidence that this was in fact the kitchen at some point. A fireplace flue. We decided to leave the lathes, since they would have just royally added to the mess.

Justin updated the room electrically., and added a 2 way switch! Thank heaven for switches at each door.
Luckily we had an electrician across the street for questions! Holy cow, we have great friends!

The drywall begins!


The window wall was the only wall in good enough shape to leave it intact. I primed the wall with pink, because I had some and thought it would make the painting easier, it did!

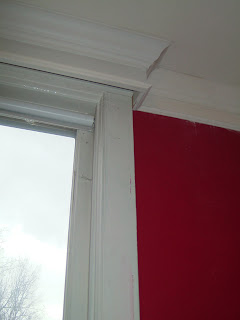
The actual paint is on below, now for the wainscoting, and crown. We used a trick for the crown which I didn’t get a close up of. We used regular crown, then about 1-2 inches below that we put up a small half round molding. We painted the crown, small half round and wall in between the same color, so it looked like a huge molding. This is a similar trick to the base molding trick we used for this house.
We did this project before we had a nail gun! What a mistake, it makes me tired just thinking about it.


Here is our friend Matt volunteering for free labor! Thanks for that!

And finally real walls, with the wainscoting. We were so tired of the project that I think it took me about 6 months to actually even think about painting and caulking it all.

We added valance boxes since the windows went right to the ceiling and that sorta messed with the crown molding, which you can see in this image.*** We got a little smart with the moldings around the window, rather than remove them, we put the new boards on top. The problem was that they were level with the plaster, so it actually worked out well without all the demolition.

Here I am LOVING our new clean carpet. We bought a remnant had it finished around the edges, it looked great but we had a few problems with it From the very beginning, we should have installed it to tack strips and stretched it really well, so that it didn’t wrinkle. Which we ended up doing later.

At this point I went our to Walmart and bought a bed in a bag set for cheap. I also made a headboard out of one of the old doors in the house. We were done with the room for about a year… And it looked like this:


We didn’t have a T.V. at all for the first year, but we bought a little one at a garage sale. I built this entertainment center from wood scraps and two old closet doors, that were original to the house. We got rid of it when we moved to Asheville, it makes me sorta sad! Can you tell I regret moving into a tiny house… and getting rid of all sorts of cool things…. bummer.


Justin thinks it is funny that we removed the closet only to build another one in the exact same place, but with all due respect to my hunky spouse, it is just so fun to watch you be all tough and build stuff that I couldn’t help myself.
The truth of the matter is that the old closet was 2 feet less wide and it was broken up at the top, and it only had one set of doors. What we did was basically build two small very organized his and hers closets.


We custom built the interior with the pre made vinyl shelving components you used to be able to buy at Home Depot, and MDF 1 x 4’s. I measured all our clothes and my side was slightly bigger, but we both had two areas for shirts and a shared area for long stuff, with laundry at the bottom shoes on the doors and shelves in the middle. We didn’t even need a dresser, and I have a lot of clothes.


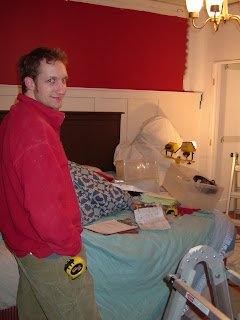

Starting to paint the real color again. For some reason the second time I bought the paint it was not as good as the first batch and took a lot more coats. I also fell off the later doing this and burned my hand from the friction of grabbint the door way! It really hurt a lot… including my pride!


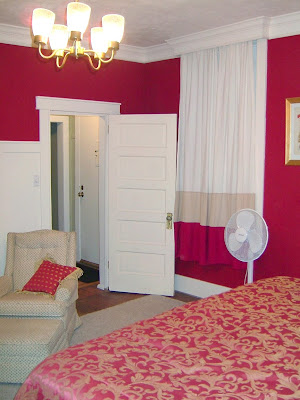
the Final Afters:
(I wish I had better pictures, but this will have to do, many were slightly fuzzy!)


The drapes are a long story, they shrunk in the wash and I had to add another layer of fabric, so to me they look a little like Neapolitan ice cream, not exactly what I was going for, but I didn’t have the time or money to change them. Oh well!


Well, what do you think?
Do you like the way it turned out?
I really loved this room, it was sad to leave!
PLEASE ENTER THE GIVEAWAY!!
Cassity Kmetzsch started Remodelaholic after graduating from Utah State University with a degree in Interior Design. Remodelaholic is the place to share her love for knocking out walls, and building everything back up again to not only add function but beauty to her home. Together with her husband Justin, they have remodeled 6 homes and are working on a seventh. She is a mother of four amazing girls. Making a house a home is her favorite hobby.


>LOVE the transformation! My husband and I are buying an old house that will need much remodeling also. Great job. It's always fun to see DIYers!
>Holy Makeover- Batman! This is an amazing transfomation! A lot of work went into this! Great job! I love the red.
>Totally gorgeous! You did a wonderful job! I love the dual color on the walls. Very chic!
>Oh wow, that room made quite a transformation! I would have been too overwhelmed to even know where to start. The finished room looks amazing!
>Holy cow! Just looking at these pictures made me tired! That room looks fantastic!
>Sure looks different, what a beautiful room!
Have a great weekend.
>All I can say is WOW!!!!!
You can see my project here…
https://bethouaknight.blogspot.com/2010/01/liannas-labels-debut-and-giveaway.html
>this is amazing, thank you for sharing. We are in the middle of a messy master bedroom re-do and this gives me hope!
>wow! what an incredible amount of work — great job!
>This is beautiful. I love the wainscoting and deep red color in particular. It is so classIC and classY.
>Thank you, thank you, thank you, thank you for not choosing turquoise and white! You obviously chose colors that make you happy and are YOU, not what the blog world is doing. Good for you!
>This is so inspiring!!!
lifeofperks.blogspot.com
>I really enjoyed reading your post. You've done so much work. And how exciting finding all these nooks and crannies everywhere! I was so engrossed in your post that when I got to the photos of the drywall up, I literally did a sigh "aaahhhh"! My husband looked at me quite strange. We are renovating too.
I look forward to having a look around your blog! Thanks!
Megs 🙂