Vanity Fair, How We Built Our Bathroom Vanity

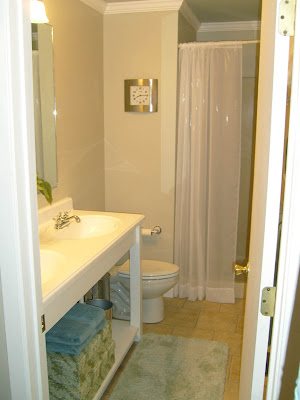

I have to admit this is one of my favorite projects ever, and I regretted selling this house mostly because of leaving this bathroom behind. One of the best features, in my mind, was that we raised the obnoxious 30″ sink height to an adult scale of 36″. Now, if you are not a tall person, by all means leave it at 30, but it felt SO luxurious to not have to bend over 15 feet just to brush my teeth or wash my hands.
I thought we would try our hand at a little tutorial, please go easy on us, this is harder than it seems, especially since everyone is at a different level of understanding when it comes to building. Please ask questions if you need help!
This is more of an intermediate project, mostly because of the tools required, BUT if you have a friend with a table saw, (bribe them to use it… cookies, babysitting) OR if you forgo the mitered edges and just butt the edges together OR use a 4 x 4, this could be a less daunting project.
There is one tool that will be necessary that you may not have, but is ideal for furniture building, and that is a pocket jig. I just looked it up at Home Depot online and it was on sale for $20.98 usually $30.00. !
The plans are made for a 5′ x 22″ double sink vanity top, available at most building supply stores. You can customize it as you choose, I am sorry I won’t be able to do that for you.
Supply check lists:
Wood:
16 pieces 3″ wide by 3′ long wood of choice (legs)
2 pieces 4″ wide x 53″ long wood of choice (front and back of bottom shelf support)
2 pieces 4″ wide x 14″ long wood of choice (ends under bottom shelf supports)
2 pieces 4″ wide x 18 1/2″ long wood of choice, (center support bracing)
2 pieces 6″ + wide x 53″ long, wood of choice (front and back of tabletop skirt)
2 pieces 6″ wide x 14″ long wood of choice (ends under bottom of table top skirt)
Bottom shelf 19 3/4″ x 58 1/2″
Tools etc.:
Table saw, for mitering legs
Miter saw or Hand saw and miter box, for cutting wood to length
Nail gun or nails and hammer (for putting legs together)
Wood glue (use on joints for strength)
Pocket screw jig (to attach skirt and supports to legs)
Drill (to drill holes and install screws)
Pocket screws (to attach skirts to legs
Instruction sheet:
You may copy this image only for personal use,
it may not be reproduced or posted on any other blog
without author’s written consent before use. Thank you.

Construction Steps :
1. Cut (16) leg boards to length and width.
Miter both long edges @ 45 degrees on table saw. (See image for the correct angle direction.)
**If you don’t have a table saw, you could use a 4 x 4 (which is actually 3 1/2″ x 3 1/2″ FYI) but you will have to re-figure the dimensions, cause I need some sleep!! just cut to length and move on to step 4, the look will be more rustic this way.
2. Nail and glue (4) leg boards together to make (4) square legs.
3. Start making cuts for the table skirts.
Cut (4 total) bottom 4″ skirt boards to length
2 long, 53″ for the front and back
2 short, 14″ for the two sides
Cut (4 total) top 6″ or more skirt boards to length
2 long, 53″ for the front and back
2 short, 14″ for the two sides
Cut 2- 18 1/2″ center brace boards to length and width.
4. Drill (3) pocket holes per end of the total of (8) top, and bottom skirt boards, to be able to fasten to legs. Make sure that all the holes are on the same side of the board. The holes will need to be on the inside of the vanity table to hide from view.
I found this little page on how to use a pocket screw jig if you are totally wondering what it is, it seems though that they are a little overzealous with the clamps, in my opinion!! Also here are two images of what the screw look like installed and how they show on one side but not the other.


I bet you have some questions, feel free to ask.
I will respond via a comment here on the blog,
and not send personal responses like I usually try to,
so that everyone can see the answer!
Cassity Kmetzsch started Remodelaholic after graduating from Utah State University with a degree in Interior Design. Remodelaholic is the place to share her love for knocking out walls, and building everything back up again to not only add function but beauty to her home. Together with her husband Justin, they have remodeled 6 homes and are working on a seventh. She is a mother of four amazing girls. Making a house a home is her favorite hobby.


>I love it thanks for sharing! My only problem is that I would have to keep the under the sink organized. I love the plans!
>This is great! It looks great! Lisa
>wowzer I am amazed!
Maggie
https://cuttlebugchallenge.blogspot.com
https://cuttingabove.blogspot.com
>This is a very cool project. I don't blame you at all for being sad about leaving it behind. I love the idea of building a vanity that is the right height, first of all, but one that is a bit more unique and has open storage. Much more interesting than stock cabinetry.
>I just found your blog and it is fantastic.
>Hi guys the work you are doing with this site is excellent,it caught my eye,I think the site is full of good and interesting notes about Remodelaholic