Boring Kitchen Island Makeover Step By Step Guide
The heart of every home is undoubtedly the kitchen, and at the center of it all is the kitchen island. It’s where culinary magic happens, where family gathers, and where memories are made. But what if your kitchen island has seen better days?
Get ready to be inspired and discover how a few creative ideas and some elbow grease can transform this boring kitchen island into a stunning focal point that will leave everyone in awe.
Before and After Kitchen Island Makeover

Here is the island before with just a lighting textured painted drywall.
Before Unsupported Counter

One of the biggest issues was the granite hanging over an edge without anything to hold it up. It seemed stable and anchored well, but visually it was not working. It felt unfinished and needed an update.
Sketch Out the Plan

Sketching out a plan helps to know if you will like what the update will look like. In this case, the client did not like the addition of the X in the panel, like we had on this farmhouse Dutch door project. So we left that out of the actual build.
Install the Beadboard

First, measure where the edges of the vertical corner boards will be and center the beadboard grooves in that space. These small details really help the project look right when it is done. Then nail on the beadboard.
Install the Boards

Now install the board and batten treatment. Start with the corner boards of the middle section.
Install Vertical Batten Pieces

Next nail on the horizontal boards on top and bottom, in-between the corners. Then the vertical dividers spaced evenly. You may notice that the bottom of the board and batten is not on the ground. The plan is to wrap the entire island in base molding over that gap.
Wrap Edges with Molding

Wrap the whole corner with wood to create a really clean finished end.
Fill Any Gaps

Fill gaps with left over MDF pieces. This makes a place to nail in the bottom of the base molding.
Install Base Molding

Here is a shot of the island with all of the molding in place.
Caulk and Patch

Be sure to take the time to caulk the 1×4’s to the beadboard. This gives it a nice professional clean look after it is painted. If you need there is a a great caulking tutorial here.
Pre-Drill Holes

The corbels will need a little bit of prep before they can be installed. Pre-drill two holes on top and two on bottom to screw the corbels to the kitchen island.
Notch Back of Corbel

With this island’s shape, there are two 22.5 degree corners that are going to get a corbel. In order to install the corbel they needed to be notched out on the table saw.
Attach Corbels

Install the corbels. In addition to the screws, feel free to use a small amount of adhesive.
Plug Screw Holes

After they are screwed in place use the plugs to fill the screw holes.
Fill, Sand and Paint

Cut the plugs flush with a multi-tool, then patch, and sand til smooth. Finish up any painting and you are set.
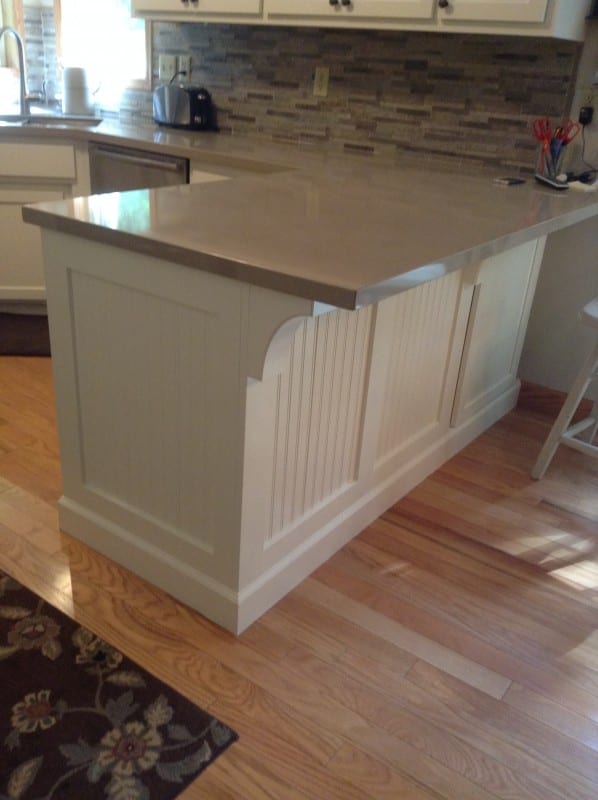
Final Kitchen View

Here is the kitchen island makeover with everything finished. It looks so much more grand and is a great focal point for the room! And the big bar now it makes a lot more sense that the corbels are there holding up the heavy granite.
Countertop Detail

Find the full tutorial with step by step instructions for the full kitchen island makeover here.
Reader Makeover:
We’ve had many people try out the tutorial with great success.
You Might Also Like:

Reclaimed Wood Kitchen Island Tutorial
Try This Project:

DIY Modern Concrete waterfall countertop
Try This Project

Upcycled Dresser into Colorful Kitchen Island
Home Trends Going Out of Style

Jump on board the time machine, and let’s check out some old home design trends that are so yesterday. We’re talking about things that used to be cool but now make us go, “Huh?” Here are 15 outdated home trends that need a major makeover!
What is a Terrible Home Design Trend?

Sometimes we dream of building a new home, and what great ideas we have for it. But we don’t want to make big mistakes, what are the horrible new home trends that we want to avoid?
10 Home Renovations that can Decrease its Value

With increasing interest rates and mortgage prices, getting the most value for your home is imperative. Homeowners and real estate agents speak about the renovations that could decrease the value of your home and why. Here are the renovations to look out for.
Declutter Fast: 7 Items Experts Say Must Go!

Every home needs to be organized and arranged to exhibit its beauty. If your space is untidy, here is how to declutter fast get rid of these seven items decluttering experts would take out now!
Cassity Kmetzsch started Remodelaholic after graduating from Utah State University with a degree in Interior Design. Remodelaholic is the place to share her love for knocking out walls, and building everything back up again to not only add function but beauty to her home. Together with her husband Justin, they have remodeled 6 homes and are working on a seventh. She is a mother of four amazing girls. Making a house a home is her favorite hobby.


