Build A Storage Console Table From A Card Table
So you saw my new favorite project last week, the Swedish clock that has been my dream to make for the last 3 years…. well, it wasn’t the only part of the project that I am really happy about. Right next to it was this little baby(see below)! A lovely grey painted storage console table that we built from a card table that we found for a steal. LOVE THAT!


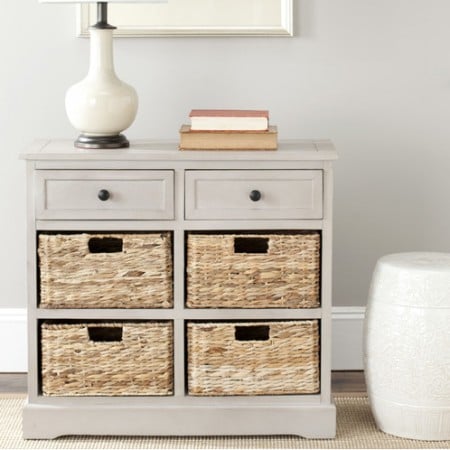
I have been making some plans for another space in my house (the end of our REALLY long hallway). Maybe by now you know that I almost always lean toward building in furniture, but the problem with that plan is that I have to start over every single time I move (and heck I move a lot, or so it seems). So, I have been trying to consider using a small console table. I wanted a something with a little storage and I LOVE this little console table from Wayfair. … so for those of you non builder, you can just go buy it, and it comes in several colors!
But then, when the paint project came up, I only had a week to do it ALL, start to finish!! In that week I decided to make the clock, board and batten wall build the table and decorate it all ( I picked my projects, I guess I am a glutton for punishment). I still really loved the look of the storage console table, even though I didn’t’ have time to order it and get it here on time.
Luckily, when we we shopping at our local Goodwill store, (the DI) we saw this table, it got the wheels in my brain turning. (it has two drawers on one side an four small drawers on the other side similar to the table above! ) These instructions are just general, especially since I can’t guarantee exactly how what you might be building but hopefully it will inspire you for a piece of furniture that might have a different life.
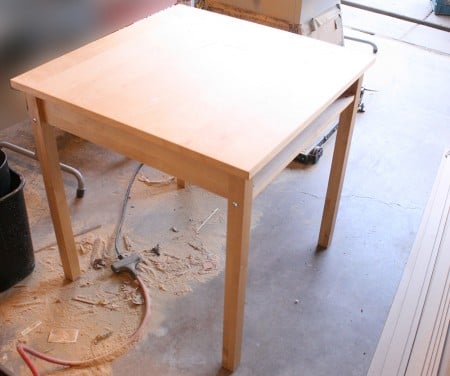
The best part was the price, yes that is right only $15.00! Deal!

Now I want to show you how we built our storage console table from this little table deal. I first needed to cut it in half. I used the table saw for this, that way, I could use the fence as a guide to cut it exactly in half. There was a support board in the middle that I had to remove before I did this. It worked out perfectly though. I had to rotate the table on its side and cut through there first, because the blade was not tall enough. Then I laid the table upside down to finished the cut.
 |
 |
I left the table frame in place and didn’t change anything with the framing and hardware around the drawer. After the table was cut in half I started framing in the base.
 |
 |
I attached a 2×3 support in between the front legs at the bottom with my kreg jig.(pictured above). I made sure that the support was flush with the front of the legs. This allowed the base molding to sit flush up against the legs and the base support.
Then I finished the box frame around the back. This created the base of the new storage console table. When attaching the box at the bottom, I aligned the base sides with the top sides. That way when I attached the sides, they would all sit level.
 |
 |
Next, I cut out and attached the bottom shelf. I just had to use the jig saw to cut out the corners where the legs sit.

I nailed the bottom shelf in place to get the base all square and ready for the sides. The side were just a rectangular piece of 1/2 MDF we had left over from another project. I nailed them to the top side rail of the table and the bottom rail. (sorry no picture of that!)

Next, I installed the center shelf. I attached a simple little shelf bracket on each side to support the middle shelf. And then placed the shelf on top!

 |
 |
Now that the sides and middle shelf was in place it was time to finish up the base.
 I always love to reuse old material if it is good shape, so I used the old base molding that was in the living room before we ripped out the carpet for the new floors. I clean up the edges to remove the old caulk and sanded them smooth to get ready for paint.
On the sides of the storage console table, I had to add a small spacer in between, since the leg stuck out a bit.

And here it is all built!. Cassity then sanded it all down, filled holes and caulked any cracks. She decided to paint it with Sherwin Williams, Pro Classic, Satin paint in #7065 Argos, I absolutely LOVE the color!

Cassity found these drawer pulls on clearance at Target that worked out perfectly.

And there you have it. A brand new storage console table made from an old existing card table. Now, I need to think about how I am going to use the other side of the card table… We are so happy with how it turned out. This is my favorite wall in the living room to look at now.


In case you were wondering about how we made the Swedish Mora clock you can check that out in building part one and part two.
Cassity Kmetzsch started Remodelaholic after graduating from Utah State University with a degree in Interior Design. Remodelaholic is the place to share her love for knocking out walls, and building everything back up again to not only add function but beauty to her home. Together with her husband Justin, they have remodeled 6 homes and are working on a seventh. She is a mother of four amazing girls. Making a house a home is her favorite hobby.


VERY impressive!
Thanks Korrie!
You all can build anything!
HA HA! Thanks! but really I think once you get comfortable with tools you could do it too! Hopefully this will get you thinking the next time you see a piece of furniture that needs a change!
That is a CRAZY AWESOME remake! When I saw the title to this post I thought “how in the world?” And you completely pulled it off, great job!
Thanks! It is sorta crazy but it worked perfect.y AND I have the other side to make something else with so that makes me happy!
Now that is amazing! Maybe one day, I’ll be bold enough to try something like that!
Gwen That is really sweet of you! I am SO happy it turned out, you never really know when these crazy ideas enter your brain!
Wow! That’s an amazing transformation! Awesome job!
Thank you so Much Ashley! Glad it is all finished!
This is awesome! I LOVE the framed art work, where did you get?
Thanks!
Cassity bought those at Target. We love them.
Love your finished project! If you don’t mind me asking, what was your finished dimensions for the table? Thanks!!
Heather, the table is 30″ tall, 29″ wide and 14.5″ deep. Thanks for loving it!