Hello, I’m Lauren from Bless’er House. I blog all about my adventures to make my new basic builder grade house look like a cozy eclectic cottage on a major budget. You can check out an entire before and after progress home tour over on my blog.
Adding a faux fireplace has been one of my favorite projects! I found a beautiful reclaimed mantel from an architectural salvage warehouse by checking Craigslist for a month or two. There are plenty out there if you take the time to look. We stripped off all of the old paint so we had a clean slate to work with. (If you go this route, too, follow all directions for the wood stripper and remember to wear a mask just in case the paint has lead in it.)
The ready-made mantel front (found for $100 on Craigslist)
Paint stripper (We used Citristrip)
Chemical resistant gloves
Scraper
Bucket
Basic paint brush
3 plywood sheets
9 2×4 boards
Carpentry nails
Finishing nails
Drywall screws
Tape measure
Pencil
Circular saw
Jigsaw
Piano hinge
Hammer
Power drill
Hack saw
DIY Faux Fireplace, Step 1: Find the center of the wall and decide on the measurements based on the mantel.
DIY Faux Fireplace, Step 2: Frame out the base of the hearth. We cut two 2x4s to a length 8 inches longer than the mantel and connected them with five 24-inch pieces of 2×4.
Nail the long sides to the end pieces first (1), followed by the center piece (2), and the other two middle pieces (3) last, as in the diagram below.
DIY Faux Fireplace, Step 3: Once the hearth frame base is secure, line it up to the center of the wall and nail the back of the frame to the wall to anchor it. (We considered cutting a couple of holes in the carpet underneath to anchor it to the floor but decided it wouldn’t be necessary with all of the weight of the faux fireplace itself. This sucker is heavy and that hearth isn’t going ANYWHERE. If we ever decide to rip up the carpet and put in wood floors, we will remove the carpet around the hearth with a box cutter and hide it with quarter round installed at the base of the hearth.)
DIY Faux Fireplace, Step 4: Measure the length and width of the top of the hearth frame base. From the plywood sheet, cut out the piece for the top of the hearth. Lay it out on the hearth frame base. Hopefully, it lines up perfectly like ours did!
DIY Faux Fireplace, Step 5: Nail the hearth top into the hearth frame base.
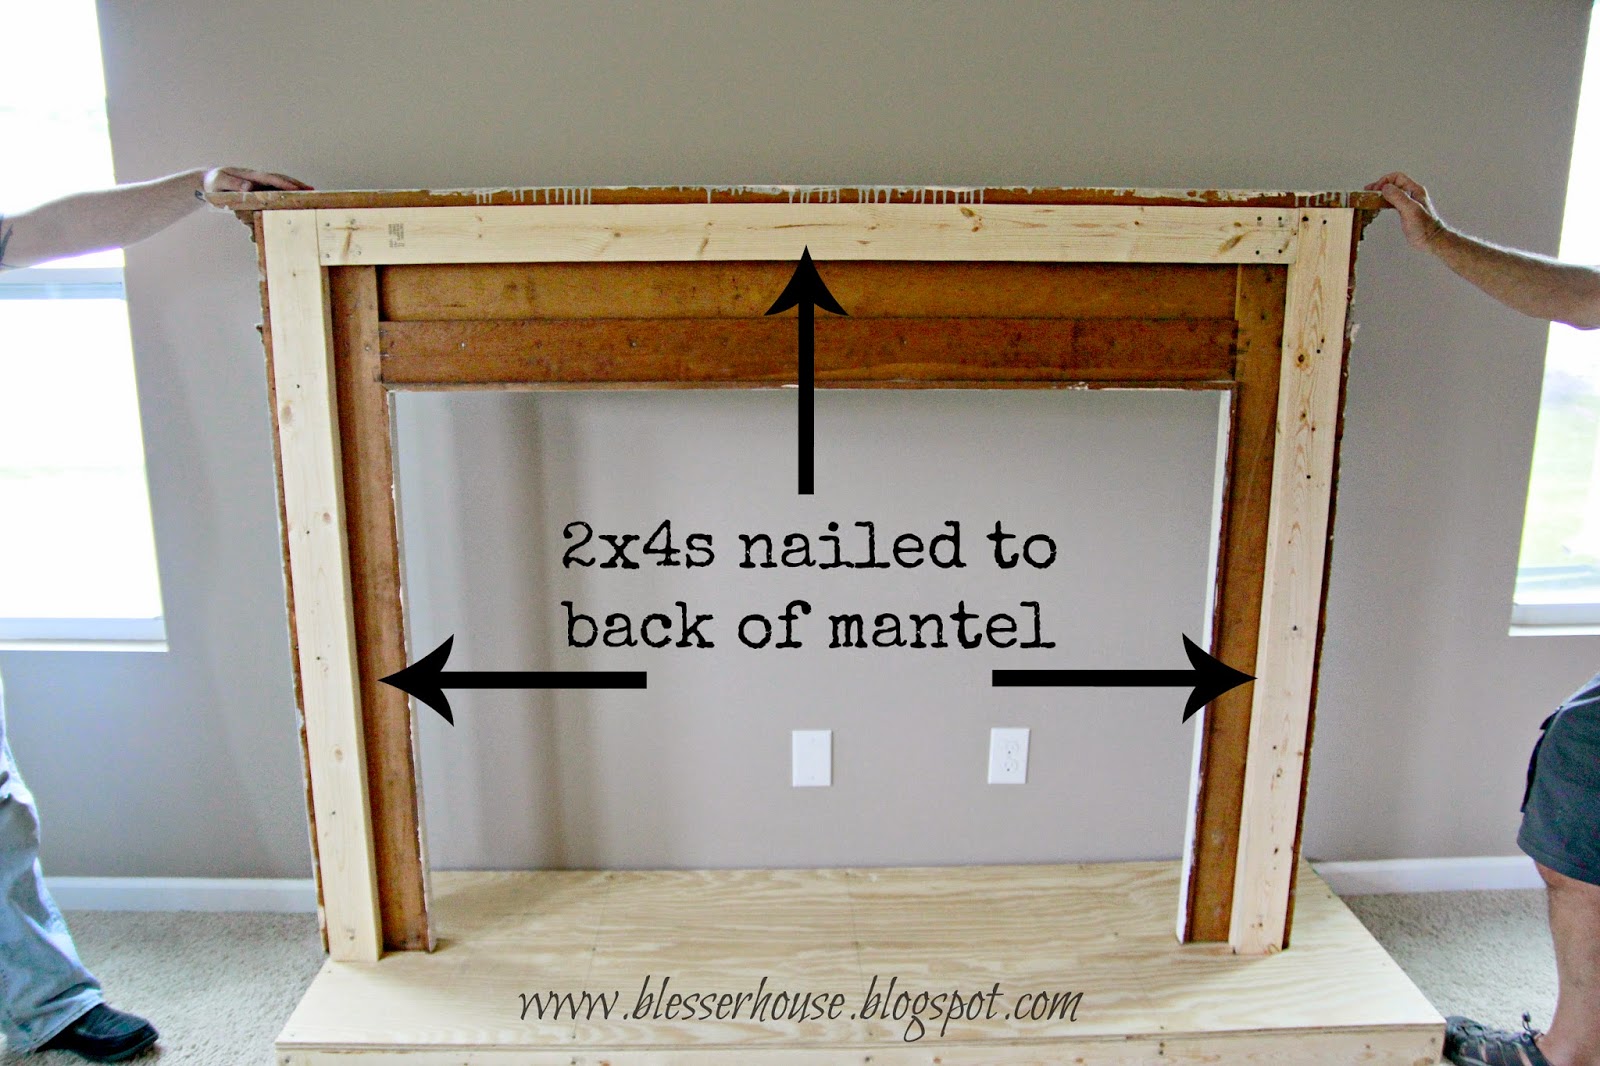
DIY Faux Fireplace, Step 6: Add anchors to the mantel. We nailed 2x4s inside the back of the frame. The distance between the edge of the mantel top and the 2×4 anchor is 2 plywood widths (to allow us to match the molding of the mantel, see step 13 below). The distance between the outer edge of each leg and the edge of the 2×4 anchor is one width of the plywood.
DIY Faux Fireplace, Step 7: On the wall, nail up 2x4s in the same exact placement as on the mantel back.
DIY Faux Fireplace, Step 8: Next, attach plywood strips to the back of the mantel to be anchors for the surround (interior of the fireplace).
DIY Faux Fireplace, Step 9: Cut a piece of plywood to the dimensions of the anchors. Place it over the mantel opening to make into the surround.
DIY Faux Fireplace, Step 10: Use drywall screws to fasten the plywood to the anchor strips from step 8.
Optional Firebox Door
Here’s where our faux fireplace becomes a bit more than just a faux fireplace. We wanted the space behind to still be useful, so we put in a door to fake a firebox. This gives us access to our outlet on the wall behind the fireplace to run our cords out of sight like a media cabinet. If this doesn’t apply for you, skip the Optional Steps 1-6 and go straight to Step 11, below.
Optional Firebox Door, Step 1: We measured for the faux firebox door and left a bit of space (1-2 inches) at the bottom to create a threshold that will support the door and keep the surround from bowing.
Hint: To cut out the door, switch to a circular saw blade that is thin and will be precise.
Optional Firebox Door, Step 2: Carefully cut out the firebox door.
For the corners, use a jigsaw to make sure each cut is exact.
Optional Firebox Door, Step 3: Create the firebox door. Cut a piano hinge (use a hack saw) to size. Screw the piano hinge into the surround piece.
Optional Firebox Door, Step 4: To make sure the door won’t cause any bowing or movement in the surround, make a door frame on the back of the mantel surround.
Optional Firebox Door, Step 5: Attach the door to the piano hinge. We had to shave off just a teeny tiny bit of the door, then it fit like a glove.
Optional Firebox Door, Step 6: Nail a 2×4 anchor to the top of the hearth where the threshold beneath the door will attach. (Somehow I forgot to photograph that step. Oops! Sorry y’all.)
Back to the DIY Faux Fireplace tutorial!
DIY Faux Fireplace, Step 11: Anchor the mantel. Nail plywood strips to the 2×4 anchors attached previously to the wall and to the back of the mantel (in steps 6 and 7). If you have the optional door, also nail the threshold beneath the door to the anchor from Optional Step 6.
After the two plywood sidepieces were up, this is what the top of ours looked like. See the outlet down there? Because of the firebox door, it will still be usable!
DIY Faux Fireplace, Step 12: To close in the top, add a plywood piece and attach it to the 2x4s on the mantel and the wall, and also to the plywood side pieces. That thing will go no where!
DIY Faux Fireplace, Step 13: We laid down one more plywood piece on the top to mimic the molding of the mantel top. Robert secured it with finishing nails.
And then helloooo fireplace!
Part Two: Faux Chimney Plank Wall
Materials we used:
9 1×6 boards cut to width of mantel (70″)
2 1×4 boards cut to height from mantel to ceiling (50″)
Level
Pencil
Popsicle sticks (or other type of spacer)
Finishing nails
Hammer
2 strips of quarter round finishing trim (50″ each)
Drill and hole saw drill bit (optional)
Plank Wall, Step 1: Decide how wide you want the plank wall to be. (Ours was big enough to incorporate the monstrous TV that Robert is bonkers for.) Use a level to draw a pencil line from the top of the mantel to the ceiling for both left and right edges.
Plank Wall, Step 2: Use the level again to draw a pencil line marking each stud in the wall.
Plank Wall, Step 3: Using finishing nails and making sure ends are lined up with pencil lines and 1×6 board is level, attach the bottom plank to the wall on the studs you marked.
Plank Wall, Step 4: Attach the rest of the boards using spacers and keeping both edges aligned with your pencil marks and the board below it.
(I’ve seen some DIYers use coins as spacers between planks, but we’re completely broke so… Ha! Okay, we’re not THAT frugal, I just happened to have popsicle sticks handy that day.)
Plank Wall, Step 5: For the last plank, measure the height you will need the 1×6 plank to be. We had to cut ours by about an inch to allow it to fit.
Plank Wall, Step 6: Once all of the planks are up, nail a 1×4 over each end. We later put a small molding piece along each of the 1x4s to completely hide the plank ends on the sides.
Plank Wall, Step 7: To run the cords straight down from the TV, drill a hole at the back of the mantel top using a hole saw drill bit.
And now she’s ready for paint!
Part 3: Adding Paint and Stone
Materials we used:
AirStone bought at Lowe’s
Hack saw
AirStone adhesive
Putty knife
Popsicle sticks (or other kind of spacer)
Concrete patio stones
Rags
Paint brush
Paint bucket
White paint (We used Valspar color matched to Sherwin Williams Pure White in semi gloss finish.)
Gray paint sample sized pot (We used Valspar Rugged Suede.)
Black chalkboard paint or other flat black paint
Paint and Stone, Step 1: Paint two coats of the white (or whatever color you choose) on all of the places on the fireplace that won’t be covered with stone.
Then paint the firebox door (or faux firebox area, if you did not create a door) with two coats of the black (or whatever color you choose).
Paint and Stone, Step 2: AirStone
Dry-fit the AirStone for the hearth.
The great thing about AirStone is it’s only $50 per 8 square feet of coverage, and no power tools are needed to cut them. A hacksaw was all we needed to cut the stones to size.
Hint: As you are fitting the stones, number the ends of the AirStone blocks so that you can put them back together later.
I chose to whitewash the hearth AirStone in the garage so that I wouldn’t have to worry about getting whitewash on our carpet.
To make the whitewash, I mixed 1 part of the white paint with 1 part water in a bucket.
Then I brushed the whitewash onto the AirStone.
I let the whitewash soak in for about a minute before dabbing off the excess with a rag.
Once the whitewash was soaked in and dry, this is what the AirStone looked like. There’s just enough of the gray peeking through.
Paint and Stone, Step 4: Fit the AirStone back together around the hearth. Apply the adhesive like frosting on a cake and press onto the hearth frame.
Then, fit them onto the bottom surround.
Paint and Stone, Step 5: Hearth
To mimic a concrete hearth, we used concrete patio stones secured with the AirStone adhesive.
Paint and Stone, Step 6: Continue with the Airstone
Work your way up around the firebox (or firebox door if you added it). We used popsicle sticks as spacers to keep the stones level since some of them were not perfectly straight.
When we got to the top, we had a small space left and AirStone is nearly impossible to cut lengthwise, so we added a small strip of molding to paint white later. Adding the popsicle stick spacers gave us enough wiggle room.
We added the AirStone to the sides of the fireplace as well.
Paint and Stone, Step 7: Paint the remaining stones
Using the same mix of whitewash as on the hearth, apply it to the rest of the AirStone and dab off the excess.
Paint the patio stones on the hearth with 2 coats.
At this point, I realized that I would rather have the AirStone white than just whitewash. I ended up painting it all white, but it’s better to try whitewash then switch to paint instead of painting and wishing you’d done whitewash. Once you paint, there’s no going back.
Part Four: Faux Stacked Log Front
Materials we used:
Log, sliced on a band saw at 2 inches
Gorilla Glue (or other strong adhesive)
Faux Log Front, Step 1: Cut a log into two inch slices (We thought this would be deep enough to be more convincing of a real log stack.)
Faux Log Front, Step 2: We detached the firebox door from where it was attached to the fireplace with a piano hinge and laid it flat. Working with the log pieces was actually fun! It was like a giant puzzle and only took me about an hour tops to get it the way I wanted it.
Don’t try to glue the pieces as you position them because I had to rearrange them as I worked to cover the entire space. I left about an inch of space on the left side to account for the hinge and opening the door later.
If laying the firebox area flat isn’t an option for you because you didn’t include the door, purchase quick-dry no-run wood glue for this part. Lay out the log pieces in a shape identical to the firebox area you will be covering and position your log pieces, rearranging as needed to get it just right. Glue the pieces to the firebox area according to the directions on the glue package.
Having included the door for ours, I glued down all of the pieces with Gorilla Glue once I was happy with the positioning and allowed them to dry thoroughly.
Once we screwed the firebox door back on the faux fireplace, we realized the door was too heavy to constantly open and close as we accessed our electronics from inside of the firebox. We chose to keep them on the mantel instead until we could figure out a better solution. But we can still access the outlet.
And that was that! Our living room officially had a fireplace! We love it!
———————————-
Okay…. now that you are all positively drooling over Lauren’s fabulous faux fireplace (WOW!!!), put your tongue back in your mouth and run over to Bless’er House to see more from Lauren. I suggest you try the faux reclaimed wood tabletop and faux planked bookcase, but it’s hard to go wrong with budget industrial light fixtures — and I know you’ll appreciate 8 ways to make the most of having NO money for home decor!
Lorene has been behind the scenes here at Remodelaholic for more than a decade! She believes that planning projects and actually completing them are two different hobbies, but that doesn't stop her from planning at least a dozen projects at any given time. She spends her free time creating memories with her husband and 5 kids, traveling as far as she can afford, and partaking of books in any form available.
We love hearing from fellow Remodelaholics, so let us know what you like about this and leave any questions below in the comments. If you've followed a tutorial or been inspired by something you've seen here, we'd love to see pictures! Submit pictures here or by messaging us over on Facebook.
Thank you SO MUCH again for having me! I am so inspired by this blog constantly, so it’s an absolute honor to be featured. Hope you have a wonderful New Year!
Thanks so much, Emily! I actually got a little sneaky with the decor on the mantel and used vintage books to disguise our box there. I’m working on a better solution, but for now it doesn’t bother us too badly on the mantel.
Wow! What a fabulous DIY fireplace makeover! Amazing! Love Lauren’s blog and so glad to find your blog now as well 🙂 One of my favorite projects we tackled this year was our fireplace as well! Happy New Year!
I’m no professional on this, Monica, but I would think since electric fireplace inserts are typically housed in wooden fireplace boxes and cabinets, it would be safe. It’s generally the same concept. We might take that route down the road, but it really doesn’t get cold here (it’s 60 degrees in December here right now) and we wanted to keep our spending as low as possible. If we attempt it, I’ll try to post an update. Hope that helps!
If there’s one thing I’d like out of my living room, it’s the fireplace. I don’t like having to arrange my furniture around it and I don’t like the tv above the mantle. Think about your furniture arrangement before you add even a faux fireplace.
Gotta say, I agree. We have a wood burning real fireplace, unusable for the last 15 years due to needing a chimney liner. Our LR is not as large as this one. Placing the television over the fireplace would not work, since we would really be staining our necks to watch it. Honestly, I think that in this LR, although it is larger than ours, they would have the same problem. They did a beautiful job. I would be uncomfortable watching TV at that height.
Beautiful job!!! So much work. You could re-do the door in two pieces, or hinge the bottom instead of the side with chains for support so it drops out like a draw bridge.
How do the wood slices hold up over time? I love the fresh cut look but do they grey over time? Did you seal them with anything to maintain their color? Thanks!
We’re going on 10 months since we built it, and the wood slices look just like the did on Day 1. 🙂 But you could definitely seal them with a matte polyurethane if you wanted. That might be a good idea for ours actually if we ever do notice the wood aging.
I’m curious why you chose chalkboard paint. I was expecting to see a cute chalk drawing of a fire at the end, but then you covered the whole thing with logs (not that the logs don’t look lovely, because they do).
I used the black chalkboard paint because I already had it in my craft stash and I needed a completely flat black. You could certainly put a cute chalk drawing on it instead, but I knew that would last two seconds with my three year-old running around. 😉


 Find many everyday ideas for decorating your mantel and also for any holiday:


Thank you SO MUCH again for having me! I am so inspired by this blog constantly, so it’s an absolute honor to be featured. Hope you have a wonderful New Year!
Thank you for being our guest, Lauren! We LOVE this!!
Oh, and I’m happy to answer any questions if anyone has any at some point.
Lauren – This is FANTASTIC!! I’d love to know how you’ve hidden your components though. Where is your satellite/cable receiver hiding?!!
Thanks so much, Emily! I actually got a little sneaky with the decor on the mantel and used vintage books to disguise our box there. I’m working on a better solution, but for now it doesn’t bother us too badly on the mantel.
Hello. How beautiful. What is the width height of the side plywood pieces?
Thank you
Great job, Lauren! It looks amazing!
Lauren I absolutely LOVE this!
We are always wishing we had a fireplace.
Great job explaining the steps.
Thanks for the inspiration!
Wow! What a fabulous DIY fireplace makeover! Amazing! Love Lauren’s blog and so glad to find your blog now as well 🙂 One of my favorite projects we tackled this year was our fireplace as well! Happy New Year!
So glad you found us, Kendra! Happy New Year!
Looks amazing! Do you think instead of a door I could stick an electric fireplace insert? Thanks!
I’m no professional on this, Monica, but I would think since electric fireplace inserts are typically housed in wooden fireplace boxes and cabinets, it would be safe. It’s generally the same concept. We might take that route down the road, but it really doesn’t get cold here (it’s 60 degrees in December here right now) and we wanted to keep our spending as low as possible. If we attempt it, I’ll try to post an update. Hope that helps!
We live in Chicago, so electric fireplace would come in handy 😉 Thanks and Happy New Year!
If there’s one thing I’d like out of my living room, it’s the fireplace. I don’t like having to arrange my furniture around it and I don’t like the tv above the mantle. Think about your furniture arrangement before you add even a faux fireplace.
Gotta say, I agree. We have a wood burning real fireplace, unusable for the last 15 years due to needing a chimney liner. Our LR is not as large as this one. Placing the television over the fireplace would not work, since we would really be staining our necks to watch it. Honestly, I think that in this LR, although it is larger than ours, they would have the same problem. They did a beautiful job. I would be uncomfortable watching TV at that height.
Beautiful job!!! So much work. You could re-do the door in two pieces, or hinge the bottom instead of the side with chains for support so it drops out like a draw bridge.
I don’t know if you have come up with a better solution yet but thought I would share this: https://decorandthedog.net/decorandthedog/2014/10/28/the-coolest-remote-control-ever-logitech-harmony-remote
Your fireplace is amazing!
Thanks for the link, Angelina! We moved so we are on to different remodeling challenges in a new house now 🙂 but that remote sounds awesome!
my head just exploded! this is sooooooooooooo wonderful! Proud of y’all!
How do the wood slices hold up over time? I love the fresh cut look but do they grey over time? Did you seal them with anything to maintain their color? Thanks!
We’re going on 10 months since we built it, and the wood slices look just like the did on Day 1. 🙂 But you could definitely seal them with a matte polyurethane if you wanted. That might be a good idea for ours actually if we ever do notice the wood aging.
I’m curious why you chose chalkboard paint. I was expecting to see a cute chalk drawing of a fire at the end, but then you covered the whole thing with logs (not that the logs don’t look lovely, because they do).
I used the black chalkboard paint because I already had it in my craft stash and I needed a completely flat black. You could certainly put a cute chalk drawing on it instead, but I knew that would last two seconds with my three year-old running around. 😉
Love this! Will you please share the overall dimensions (including debth for the hearth)?
When searching for the mantel – what did you search on craigslist?
Can you please post the dimensions of the fireplace? Would love to know! Thank you
Hey! This looks great. How many boxes of airstone did it take?
Looks great!! What are the dimensions for the space you cut out of the plywood?
Looks awesome, where you used popsicle sticks, what did you use to fill the gaps?
Great work 🙂 doing too much hard work for fireplace I will try this kind of 🙂